How to fade audio in final cut pro in macbook air or pro? Final Cut Pro has multiple methods for adding fade-ins and fade-outs to audio clips and audio components:
Using the Modify option, you may apply fades. Quickly alter the volume levels of chosen audio clips or sound components by selecting them from the Adjust menu. Final Cut Pro settings allow you to customize the fade length.
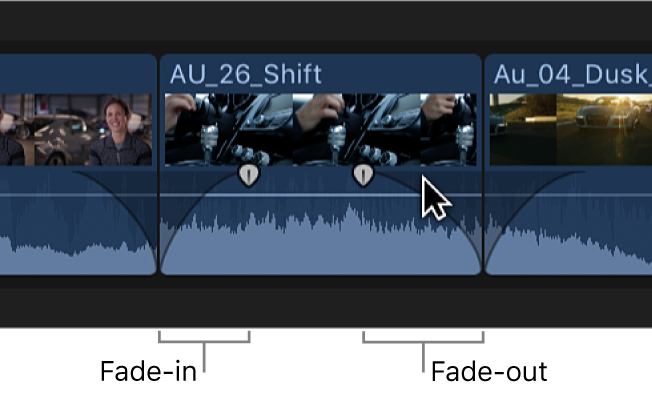
The audio component of a clip or a timeline audio component may benefit from manual fade-ins or fade-outs created using fade handles. When you put the cursor over a clip, fade handles appear inside an audio waveform’s top-left or top-right corners. Additionally, you may choose from a variety of predetermined fading shapes. The sound of a fade may be altered by altering the form of the Fade.
Fade handles override Crossfades caused by transitions. Crossfades in Final Cut Pro may be found at the following link: Crossfade audio with Final Cut Pro.
Select one or even more audio clips and video clips with audio from the Final Cut Pro timeline.
Make the following decision:
- Select Modify > Audio Fades Adjustment > Apply Fades to make changes to the audio.
- Fades occur at the beginning or conclusion of the chosen segments or clips.
- The Apply Fades function doesn’t override a fade already present in a clip.
- The Fade In option may be found by clicking on the Modify button.
New fades are added if the chosen clip or clips don’t already have them at the beginning. If the chosen clip or clips already have fades at the beginning, those fades are eliminated.
Then choose Modify > Audio Fades Adjust > Fade Out.
If the chosen clip or clips don’t already have fades at the conclusion, they will be added. Existing fades after the chosen segments are deleted.
To change the length of a fading, drag the fading handle to the place where you want it to fade to start or finish.
One-half-second is the standard time for fades. Final Cut Pro’s Editing options may be found under the Preferences menu.
Using fade handles, create a custom effect.
You may use the fade handle inside the Final Cut timelines to initiate or finish the Fade.
Handles at the beginning and conclusion of a clip are used to add or remove a fading effect.
Fades may be used to enhance whatever volume changes you’ve previously made to the clip. Fading in will raise the volume from (–dB) to the level you’ve previously defined, for example, if you’ve previously set the volume lower to begin with a clip.
FAQs-
Is there a way to softly fade Audio on a MacBook?
On your Mac, hover your cursor over the audio section of a clip’s timeline to display fade controls for that particular clip’s Audio. To begin or terminate the Fade, move the fade slider to the desired location in the clip.
In iMovie, how can I fade out a song in the middle?
Start by selecting an audio clip inside the timeline while editing your film in iMovie. The Audio Inspector will be opened as a result of this. To see your fade handles, choose Audio, then hit Fade. If you want to customize your sound’s beginning and ending points, you may do so using the first or second fading controls.