How to add subtitles in final cut pro in macbook air or pro? Final Cut Pro allows you to add captions to your projects, such as closed captions or subtitles. Captions in Editing Software have their role-based hierarchy. Caption formats (CEA-608, ITT, or SRT) must be selected before creating a new set of subtitles. Then, you establish a role and sub role for each translation system. Clips are always linked in captions. Connected clips may also have captions attached to them.
Get One Of The These To Launch The Role Of Editor In Final Cut Pro:
- Change > Edit Roles.
- Click Edit Roles in the timeline’s Roles pane.
- To access the Captions pane, click on the Captions button at the top of a role editor.
- Click the Subtitle Role button and pick a caption style from the pop-up list: ITT, CEA-608 or SRT.
- It shows inside the Subtitle Roles list the format you selected for the new role. At any moment, you may click on a job and alter its name.
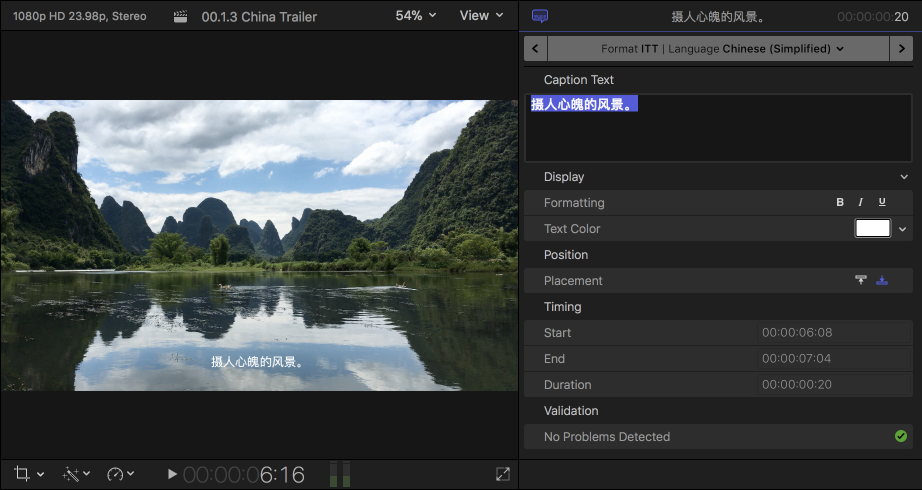
Caption Language Sub role is created by default in Final Cut Pro depending on macOS System Preferences. Final Cut Pro, for example, produces a sub role again for the English language if macOS is set to English. Select Apple menu > System Settings > Language & Region to alter the preferred language setting.
Add a caption to the image.
After moving the cursor over a caption role, click on the Language button in the Subtitles pane, and choose a language from the resulting pop-up menu.
The language sub role has been added to the list of available roles.
A role or sub-role may be deleted by clicking the Delete key (–) next to its name while the cursor is hovering over it.
To finish, click the Apply button.
Any application in the library may now use the roles or sub-roles you established. See the Create Captions section below to build the actual captions & assign them to sub-roles. –
Before creating, syncing, or editing the captions, ensure the dialog and accompanying audio in the project are “locked” (entirely done).
This may happen, for instance, if you add captions and afterward make modifications to conversation clips later on in the project.
Place the playhead at the desired location on the timeline in Final Cut Pro.
Go to Edit > Captions and then Add a Caption to begin the editing process.
A new clip is placed on top of the timeline to change the captions.
In the play, the caption is linked to the main plot. If the playhead is above a clip that already has a caption attached to it, the caption will be attached to that clip. See Connect the caption to a clip that is linked.
FAQs –
QuickTime on a Macbook Air doesn’t have subtitles. What should I do?
On your Mac, inside the QuickTime Player software. You may perform one of the following things after opening a movie with titles or captions open: Subtitles for this video are available below. View > Subtitles, and then select a language from the drop-down menu.
In QuickTime Player for Mac, how can I import SRT files?
The QuickTime frame of the video may be accessed by clicking on it. Put the playback to where it was at the beginning. This guarantees that your subtitles are in sync. By selecting Modify > Add to Movie, you may add subtitles to your video.